
RO Installation: A Safe Under-Sink Setup Guide
Install an under-sink RO system: check pressure and fit, connect the cold feed, faucet, drain and tank, then flush and inspect for leaks.
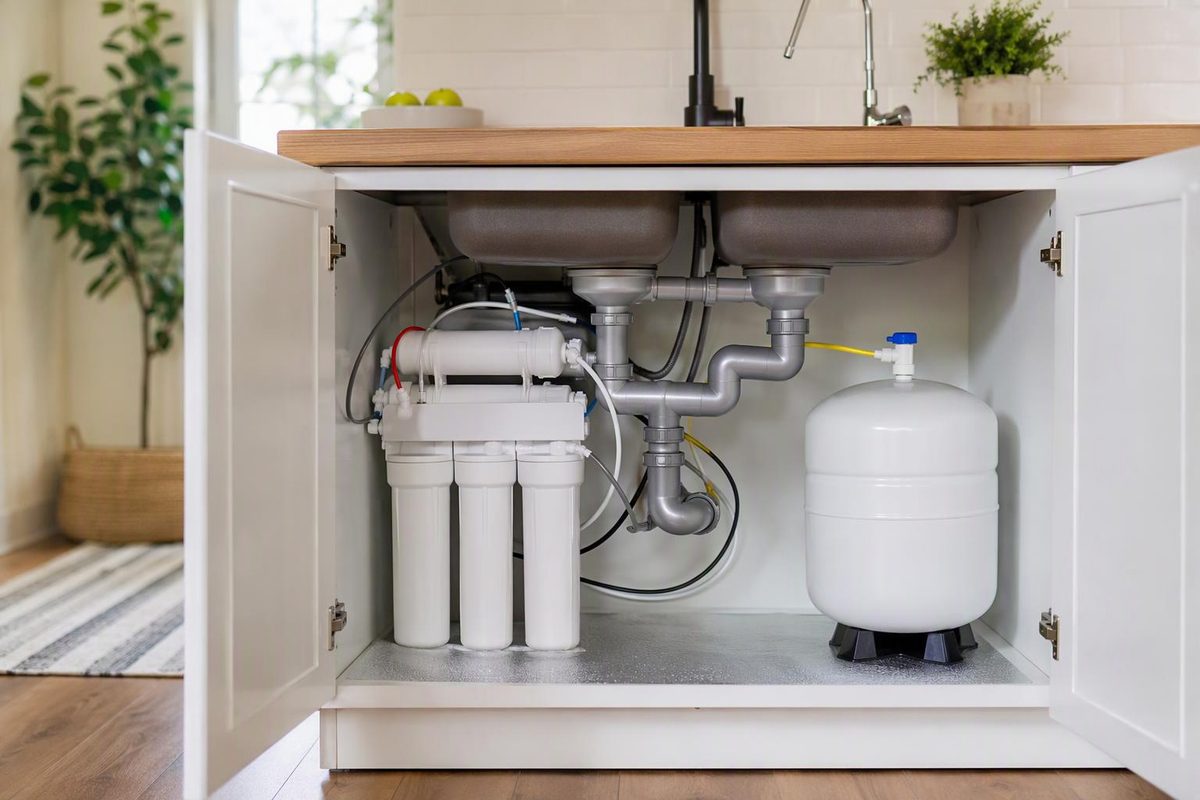
A conventional under-sink RO installation has four water connections: cold-water feed, drain, dedicated drinking-water faucet and storage tank. A tankless system usually omits the tank but may require a nearby grounded electrical outlet. Use this guide to understand the job, but follow the instructions and tubing diagram for your exact model whenever they differ.
Check the site before opening the plumbing
Confirm these items first:
| Check | What to verify |
|---|---|
| Treatment | The exact model has a certified claim for the contaminant you need to reduce |
| Feed water | Pressure, temperature, pH, hardness, iron, turbidity and TDS are within the model’s limits |
| Supply | An accessible, working cold-water shutoff is available |
| Faucet | There is a suitable existing hole or a surface that can be drilled safely |
| Drain | The manual’s approved connection can be made above the P-trap |
| Space | The module, tubing and tank fit with clearance for future cartridge changes |
| Power | A suitable nearby outlet is available if the system has a pump or electronics |
NSF/ANSI 58 covers RO-system material safety, structural integrity, TDS reduction, efficiency and other performance requirements. TDS reduction is required under the standard, but claims such as lead, nitrate, fluoride and VOC reduction are optional. Check the certification listing and performance data sheet for the exact model, rather than treating “NSF 58” as proof that every listed contaminant is reduced (NSF).
Operating limits are also model-specific. For example, one Watts under-counter manual specifies 40–85 psi (2.8–6.0 kg/cm²) and 40–100°F (4.4–37.8°C). Do not borrow those numbers for a different unit; read its manual and install a pressure regulator or booster pump if that manufacturer requires one (Watts RO-Pure manual).
RO is not a substitute for making an unsafe source microbiologically safe unless the complete treatment system is designed for that purpose. The Watts manual warns against using its unit on microbiologically unsafe water without adequate disinfection. Private-well owners should identify the water problem first; EPA recommends annual testing for total coliform bacteria, nitrate, TDS and pH, plus tests for locally suspected contaminants (EPA).
Tools and supplies
The kit should provide its feed-water adapter, faucet, drain fitting, tubing and tank valve where applicable. Typical additional items are:
- Bucket and absorbent towels
- Adjustable wrench and pliers
- Screwdriver
- Tape measure and marker
- Sharp tubing cutter
- Drill and surface-appropriate bits, only if new holes are required
- Flashlight
Do not assume generic adapters or tubing will fit. Inventory the box against the model’s parts list before shutting off the water.
Under-sink RO installation, step by step
1. Shut down and prepare
Clear the cabinet. If there is an outlet below the sink, unplug the disposal and other appliances before working around water. Close the cold-water stop valve, open the sink’s cold tap and wait until flow stops.
If the stop valve will not close fully, is corroded or begins leaking at its stem, stop and have it repaired before proceeding.
2. Install the RO faucet
Use an unused accessory hole when its diameter matches the faucet specification. Otherwise, verify what the sink or countertop is made from before drilling. Stainless steel, composite, stone and porcelain-coated sinks require different tools and techniques.
The University of Nevada, Reno advises against inexperienced drilling of porcelain-coated cast iron because the material can crack; its installation guide recommends a suitable countertop location over the sink as an alternative (University of Nevada, Reno). Use a countertop fabricator or plumber when the material is uncertain, expensive or difficult to drill.
Fit the faucet’s gasket and hardware in the order shown in its manual. An air-gap faucet has extra drain tubes, so do not route it as though it were a one-tube, non-air-gap faucet.
3. Add the cold-water feed adapter
Disconnect the faucet supply from the cold angle stop and install the supplied adapter in the illustrated orientation, with every specified washer in place. Reconnect the faucet supply and keep the RO feed valve closed for now.
Never connect a standard RO unit to the hot-water line. Hot water can damage its membrane and other components. Apply thread-sealing tape only where the manufacturer directs it; compression connections and gasketed adapters commonly seal without it.
4. Make the drain connection
Place the drain saddle or approved drain adapter exactly where the manual permits. For the cited Watts system, the saddle fits 1¼- to 1½-inch drainpipe and must sit at least 1½ inches above the P-trap nut or disposal crossbar. Its manual also says not to install the saddle downstream of a garbage disposal, where debris can obstruct the RO drain (Watts). These dimensions and restrictions are examples, not universal specifications.
Align the gasket and fitting, drill through one wall of the drainpipe, and tighten both sides evenly without crushing the pipe or cracking the saddle. Route gravity-drain tubing as the exact manual shows. For the cited air-gap model, that means a short, straight run sloping down from the faucet to the saddle, without a bend or dip that can cause water to back up through the air-gap hole. Follow the model instructions and local plumbing requirements for an air gap or other backflow protection.
5. Position the module and tank
Mount the module where the cabinet can support it and where cartridges can be removed without dismantling the plumbing. Leave the manual’s required service clearance below filter housings.
Place a conventional storage tank on a level, supported surface. Install its valve as directed, but do not alter the factory air charge unless the troubleshooting procedure specifically calls for it. Position a tankless unit so its front or filter-access panel remains reachable. Powered tankless models may need an outlet; Pentair, for example, specifies a nearby outlet for its grounded QuickConnect unit (Pentair).
6. Cut and connect the tubing
Follow the model’s color-coded diagram rather than relying on color conventions from another brand. A typical tank system connects:
- Cold feed to the prefilter inlet
- RO drain outlet to the drain connection or air-gap faucet
- Product-water line to the tank circuit
- Postfilter outlet to the drinking faucet
Cut each tube squarely. Remove burrs, push the tube fully to the internal stop, then tug gently to confirm that the collet has gripped it. Avoid kinks, heat sources and sharp cabinet edges. Do not remove an inline flow restrictor or shorten a tube containing one.
If supplying a refrigerator, use the manufacturer-approved connection and an accessible isolation valve. Leave that branch closed through initial flushing.
7. Start slowly, flush and inspect
Keep the RO faucet open and, on a tank system, follow the manual’s initial tank-valve position. Slowly open the cold-water stop and RO feed valve. As water enters:
- Inspect the feed adapter, housings, tank valve, faucet and every push fitting.
- Confirm that concentrate reaches the drain without backing up through the faucet’s air gap.
- Correct leaks before leaving the system pressurized.
- Flush for the exact time or number of tankfuls specified by the manufacturer.
Startup instructions vary substantially. The cited Watts tank model takes about 3–6 hours to fill under stated conditions and requires three complete tank flushes before the fourth tank is used; its manual also says to recheck frequently for leaks over the next 24 hours (Watts). A tankless model may instead specify a timed continuous flush. Do not substitute one procedure for the other.
After flushing, dry every connection and cabinet surface. Check again after the tank fills, after drawing several glasses and the next day. A dry paper towel held beneath a fitting makes slow seepage easier to see.
Verify the installation—not just the taste
Record the installation date, model, cartridge numbers and required service intervals. A handheld TDS meter can establish a useful feed-versus-product baseline for later membrane checks, but it does not identify lead, nitrate, PFAS, microorganisms or other individual contaminants. When confirmation of a health-related contaminant matters, use laboratory testing appropriate to that contaminant and your jurisdiction; EPA directs private-well owners to state-certified drinking-water laboratories (EPA).
RO also creates a reject stream. EPA says typical point-of-use systems may discharge 5 gallons or more for each gallon treated, while WaterSense-labeled models must discharge no more than 2.3 gallons per gallon produced (EPA WaterSense). If a tank-based system continues draining after its tank should be full, consult the exact model’s troubleshooting procedure rather than assuming the flow is normal.
For system selection and operating tradeoffs, see Reverse Osmosis: How It Works and When It’s Worth It. When service is due, change RO filters by isolating and depressurizing the system first, and match replacements by model and part number rather than stage count alone (replacement-filter guidance).
When to call a plumber
Stop the DIY installation if the shutoff valve does not hold, the supply or drain plumbing is corroded, local rules require a particular air gap, the countertop needs specialist drilling, or no approved drain location is available. A plumber is also the safer choice for shared or rental plumbing, hard-piped refrigerator runs, electrical work, or any connection that continues to seep after being remade correctly.