
How to Filter Homebrew Beer Based on Haze Type
For kegging, finish fermentation, settle and chill the beer, then pass it through a beverage-compatible filter into a purged keg before carbonation.
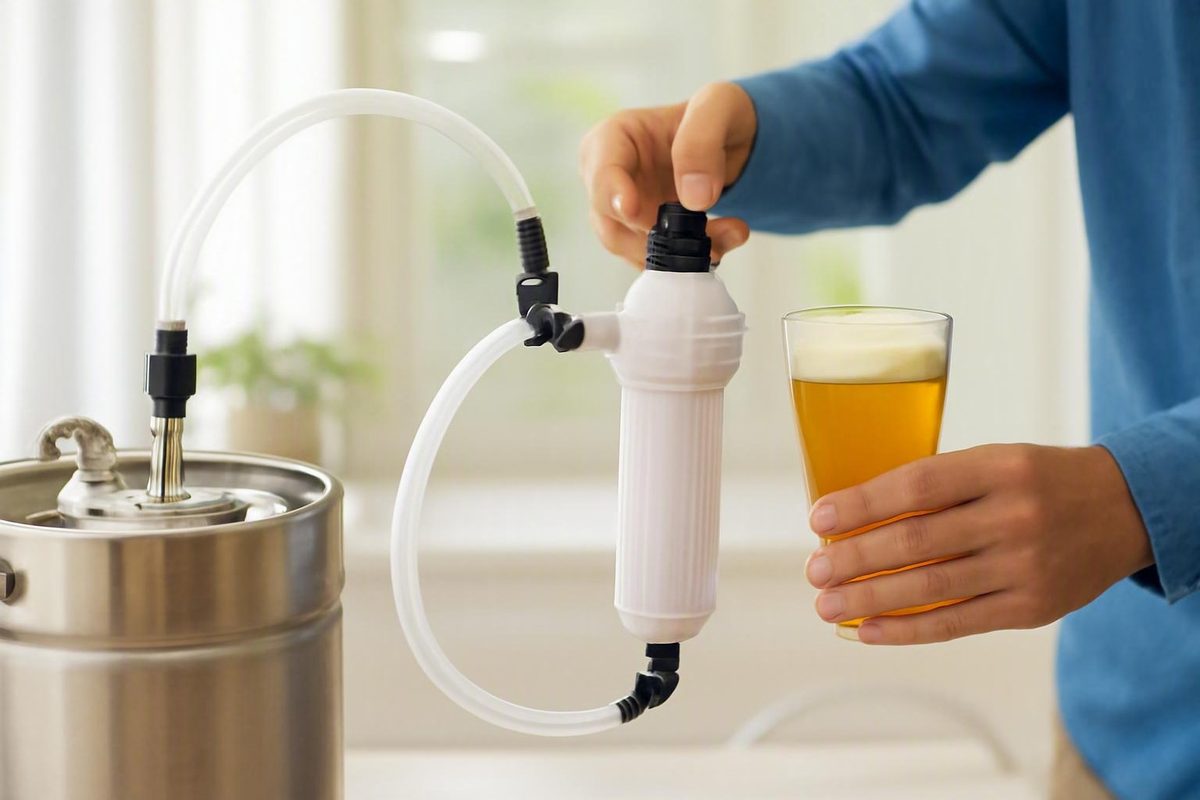
Clearer beer without sacrificing the batch
Learning how to filter homebrew beer is less about finding the smallest micron rating than deciding what clarity means for a particular batch. Mechanical filtration can quickly reduce suspended yeast and sediment, but it also adds equipment, cleaning, oxygen exposure, retained beer, and more opportunities for clogging or leakage.
For most kegging homebrewers, the practical method is to finish fermentation, let the beer clarify as much as possible, rack it off heavy sediment, chill it, and transfer it before carbonation through a beverage-compatible filter into a sanitized, thoroughly purged receiving keg. Carbon dioxide supplies the transfer pressure, and the beer enters the destination through its liquid post.
Filtration is a polishing operation—not a cure for incomplete fermentation, starch haze, poor process control, or every form of chill haze. Success depends on diagnosing the cloudiness, choosing the least aggressive media that meets the goal, and controlling oxygen and pressure throughout the complete liquid path.
Decide whether the beer needs mechanical filtration
Finished-beer filtration is a final clarification step performed after fermentation. Appropriate goals include accelerating clarification, reducing suspended yeast or sediment, and achieving greater visual brilliance before serving. It should not be used to interrupt active fermentation or compensate for an unstable beer.
Before buying media, ask: What problem am I trying to solve? “I need this lager bright for an event next week” is a defined goal. “Homebrew is supposed to be filtered” is not.
Many beers become acceptably clear through:
- Additional settling time
- Cold conditioning
- Careful racking above the sediment
- Suitable kettle or post-fermentation finings
- Avoiding unnecessary movement after sediment has formed
These methods require less handling and generally retain less beer. Mechanical filtration becomes attractive when time is limited, the yeast refuses to settle, sediment reduction is especially important, or visual brilliance justifies the extra work. Specialist brewing guidance likewise treats filtration as optional and recommends starting with well-settled beer instead of loading a small filter with the batch’s entire sediment burden (Brew Your Own’s filtration guidance).
A useful decision framework has three paths:
- Wait or use finings. Choose this when time is available and the beer is gradually clearing. It is usually the simplest option.
- Use one polishing stage. Choose this for cold beer that is already mostly clear but needs faster or more complete visual polishing.
- Use coarse and fine stages. Choose this when the beer still contains enough suspended material to load fine media rapidly. The coarse stage protects the finer one; it does not make filtering a thick yeast slurry practical.
Do not assume brighter is always better. Yeast, proteins, hop material, and other suspended compounds may contribute to the intended appearance and character of Hefeweizen, hazy IPA, cask-style ale, yeast-forward beer, or a deliberately full-bodied recipe. Aggressive filtration can work against those designs.
Packaging also belongs in the initial decision. The most straightforward workflow ends in a keg that will be force carbonated. Substantial filtration may remove enough yeast to make natural carbonation less predictable, so decide how the beer will be packaged before selecting the media.
Identify what is making the beer cloudy
A filter can retain only material that reaches it in a removable form and falls within the media’s effective retention characteristics. Diagnose the haze before choosing a micron number.
Suspended yeast and sediment may produce uniform cloudiness, drifting particles, or a visible deposit. The beer may clear from the top downward while a compact layer accumulates at the bottom. Ordinary homebrew filtration can address much of this material, although settling and careful racking may solve the problem without a filter.
Chill haze appears or becomes stronger when beer is cold and diminishes as it warms. It involves cold-forming associations commonly involving proteins and polyphenols. Some of these particles can be smaller than ordinary polishing media will reliably retain. Filtering cold presents more of the formed haze to the media, but it does not guarantee complete removal.
Permanent haze remains visible after the beer warms. Some of its suspended material may be removable through polishing filtration, depending on particle size, media construction, and the beer itself.
Starch haze and other process-related defects are different problems. Recipe design, mash performance, wort handling, ingredient selection, and clarification practices may need attention in the next batch.
A simple temperature comparison is useful:
- Pour a sample of the finished beer cold.
- Observe its cloudiness and sediment.
- Let the covered sample warm.
- Check whether the haze weakens, disappears, or remains substantially unchanged.
If the beer clears as it warms, chill haze is probably a major contributor. Cold filtration may reduce it, but very fine particles can remain. If the cloudiness persists, suspended yeast, permanent haze, starch, or another process issue may be involved. A brewing clarification overview similarly distinguishes small chill-haze particles from much permanent haze and explains why temperature behavior matters before media selection (MoreBeer’s clarification overview).
When diagnosis points away from removable suspended solids, consider additional conditioning, appropriate finings, or recipe and process correction instead of progressively tighter filters.
Keep finished-beer filtration separate from brewing-water treatment. Water treatment may use activated carbon to reduce chlorine or other unwanted compounds, or reverse osmosis to change the starting mineral profile. Those operations occur before brewing and solve different problems. An archived filtration-vendor FAQ discussed both water treatment and finished-beer filtration, but its old micron recommendations were rules of thumb without a stated rating type or test basis.
Choose a filter format and micron range
For a practical keg-to-keg system, the main options are plate-and-sheet filters and cartridge filters. Both can work. Compare them by media area, solids capacity, pressure compatibility, cleaning burden, leakage risk, and retained beer—not just the printed micron rating.
Plate-and-sheet filters
Plate filters compress pads or sheets between plates, providing a relatively broad filtration area in a compact assembly. Depending on the design, advantages may include:
- Broad media area
- Multiple available pad grades
- Easy replacement of disposable media
- Visual access during assembly
Possible disadvantages include:
- Pads that are generally single-use
- Bypass caused by incorrect orientation or compression
- Seepage around plates
- Beer absorbed by pads and retained in channels
- Media-specific flushing requirements
- More exposed joints than a sealed cartridge housing
Plate-filter capacity varies. A broad pad may resist clogging better than a small cartridge, but a pleated cartridge can have substantial effective area. Format alone does not determine capacity.
Cartridge filters
Cartridge systems enclose replaceable media in a housing. Cartridges may be pleated, spun, wound, or otherwise constructed, and those differences affect area, depth, flow, and solids loading.
Potential advantages include:
- A sealed housing when correctly assembled
- A wide range of media constructions
- Pressure-capable designs
- Pleated options with substantial effective area
- Possible reuse when explicitly permitted
Potential disadvantages include:
- Beer retained in the housing
- Limited visibility of media loading
- Bypass if the cartridge is not properly seated
- Difficult cleaning validation in reusable media
- Rapid clogging in small or very fine cartridges
- Wide variation among household-style housings and cartridges
Reuse is not automatic. Clean, backflush, store, and replace a cartridge only as its manufacturer permits.
What micron ratings mean
A micron number is not a universal promise that every larger particle will be removed. A nominal rating is an approximate performance designation and may allow some particles at or above the stated size to pass.
Check the manufacturer’s documentation rather than treating “absolute” as a universal standard.
Two filters labeled “5 micron” may perform differently because of:
- Nominal versus absolute rating
- Surface versus depth construction
- Effective media area
- Media thickness and flow path
- Pore-size distribution
- Sealing and bypass control
- Solids capacity
- Pressure differential
- Beer temperature and composition
For homebrew planning, useful nominal conventions are:
- About 5–10 microns: coarse reduction of yeast, sediment, and larger suspended material
- About 1–5 microns: finer visual polishing of cold, already clarified beer
These are starting ranges, not removal guarantees. Brewing guidance describes nominal media in those ranges for staged yeast reduction and polishing while cautioning that finer filtration may remove desirable beer constituents (guidance on nominal ratings and staged filtration).
One stage is often enough when the beer is already bright or nearly bright. If fine media would face a meaningful solids load, a coarse stage around 3–10 microns can precede a finer stage around 1–5 microns. Staging can reduce premature loading but adds another prepared liquid path, more retained beer, and another opportunity for oxygen exposure.
An older vendor rule of thumb suggested 5 microns for most yeast, 1 micron for many haze particles, and 0.5 micron for much chill haze. Because the archived page did not state whether those values were nominal or absolute—or provide a testing basis—they should not be treated as universal thresholds.
At about 0.45 micron, beer references move into membrane-based microbial or “sterile” filtration terminology. This is not ordinary cosmetic polishing. Fine membranes have little capacity for solids and can block rapidly, while microbial control also requires validated operation and sanitary downstream packaging. Passing beer through a membrane does not make the fittings, receiving keg, or packaged beer sterile.
Avoid activated-carbon media for finished beer. Carbon adsorbs dissolved compounds and may remove wanted aroma and flavor along with unwanted material. Likewise, do not assume a household water cartridge is suitable merely because it fits a convenient housing. Use documented beverage-compatible media with known food-contact, chemical, temperature, and pressure suitability.
Prepare the beer and filtration system
Preparation determines whether filtration becomes a short polishing operation or an attempt to force cloudy beer through blocked media.
Confirm that fermentation is complete using the reliable method you normally use before packaging. Give the beer time to settle, cold-condition it when appropriate, and rack above the heavy yeast layer into a clean source keg.
The source beer should ideally be cold, mostly clear, and not yet force carbonated. Cold conditioning settles material before it reaches the filter and brings cold-forming haze into view. Filtering before carbonation also avoids much of the foaming and dissolved-CO2 loss associated with moving carbonated beer through restrictive media.
An equipment-neutral setup includes:
- A clean source keg containing settled beer
- A CO2 cylinder, suitable regulator, and gas connection
- A beverage-compatible plate assembly or filter housing
- Correct pads, sheets, or cartridge
- Beverage tubing and compatible fittings
- A sanitized receiving keg
- An equipment-approved way to vent the receiving keg
- Optional replacement media for an unexpectedly heavy solids load
Before assembly, verify media orientation and any required support plates, gaskets, springs, seals, or adapters. Confirm that every wetted component is suitable for finished-beer contact.
Check the operating instructions and pressure limits for the housing or plate assembly, kegs, regulator, tubing, disconnects, fittings, and venting accessory. Operate the connected system only within the limits and procedures specified for all its components; do not borrow a pressure setting from a different setup (equipment-specific operating examples).
Treat cleaning, sanitizing, and media preparation as separate jobs:
- Clean reusable equipment to remove residue.
- Sanitize all product-contact surfaces using a compatible product according to its labeled instructions.
- Prepare or flush the media only as its manufacturer directs.
Some cellulose sheets require flushing to remove loose fibers that could contribute a papery flavor. No universal soaking time, sanitizer strength, or flushing volume applies to every pad or cartridge. If water or sanitizer fills the housing and lines, account for the air and oxygenated liquid that must be displaced before beer enters.
Assemble the complete system and leak-test it with an appropriate liquid. Correct drips, loose fittings, incorrectly seated cartridges, plate-compression problems, and suspected bypass before exposing the batch. After testing, drain or displace the liquid in a manner permitted for the equipment and prepare the connected beer path for transfer.
Keep replacement media available. Fine or low-area filters can stop flowing before the source keg is empty if the beer contains more yeast than expected.
Filter the beer with a closed keg-to-keg transfer
The basic flow path is:
CO2 cylinder and regulator
          ↓
source keg gas post

source keg liquid post
          ↓
filter inlet → filter media → filter outlet
          ↓
receiving keg liquid post
          ↓
beer enters through the destination dip tube

receiving keg gas side
          ↓
equipment-approved gas-post, relief-valve,
or spunding/venting arrangement
Beer enters through the receiving keg’s dip tube and fills from the bottom instead of splashing into the headspace. The destination releases displaced gas through an approved, controlled venting arrangement.
1. Chill, settle, and rack
Allow fermentation to finish, then settle and chill the beer when appropriate for the style. Rack above the compact sediment into the source keg. Avoid carrying the heavy yeast layer forward; the filter should polish the beer, not serve as the primary sediment separator.
2. Install and prepare the filter
Install the pads or cartridge in the specified direction and position. Assemble all plates, seals, supports, adapters, and closures. Clean reusable equipment, sanitize the product-contact surfaces, prepare the media as instructed, and leak-test the completed path.
Correct any leak before proceeding. Added pressure is not a remedy for a poor seal.
3. Purge the destination and connected path
Purge the receiving keg using an established procedure compatible with that keg and its accessories. Then address the housing, media voids, tubing, disconnects, and fittings rather than assuming that headspace purging alone has displaced air from the complete liquid path.
For compatible equipment, one possible approach is to fill the closed path with an appropriate liquid and displace it with CO2. That is a design-dependent method, not a universal instruction: some media or housings may require a different preparation or purge procedure. Follow the filter and housing manufacturers’ directions.
4. Connect the outlet to the destination liquid post
Connect the filter outlet to the receiving keg’s liquid post so beer travels down the destination dip tube. Bottom filling reduces splashing and agitation but does not substitute for adequate purging.
Confirm the required flow direction. Reversed pads or cartridges may produce poor retention, bypass, or equipment-specific media problems.
5. Establish controlled flow
Connect CO2 to the source keg and establish the approved venting arrangement on the destination gas side. Apply only the pressure needed for stable flow in that particular setup.
There is no universal filtration pressure. Remain within the operating instructions for the filter, housing, kegs, regulator, tubing, fittings, disconnects, and venting device. The safe procedure is the one supported by the actual connected equipment—not a number copied from another brewer’s system.
6. Monitor the transfer
Remain with the system and watch for:
- Liquid around plates, seals, fittings, or hose connections
- Foam in the housing or tubing
- Failure of the destination to release displaced gas
- Unexpected pressure behavior
- Rapidly declining flow
- Cloudy output suggesting bypass or damaged media
If anything changes unexpectedly, stop the gas input and follow the applicable equipment instructions for isolation, venting, and depressurization before inspection. Pressure and disassembly procedures are equipment-specific and should not be improvised.
7. Complete coarse filtration before fine polishing
When using two stages, send the beer through the coarse media first. The finer stage must also have a cleaned, sanitized, and purged path, whether the housings are connected inline or the polishing stage is performed as a separate transfer.
Two stages can protect fine media from rapid loading, but they also add surfaces, retained volume, and handling. Do not add a second pass unless the clarity target or solids load justifies it.
8. Stop before the source keg runs dry
End the transfer before the source keg begins sending gas or disturbed sediment into the filter. The exact behavior at the end of a transfer varies by system, but continuing after the beer is depleted can cause agitation and complicate recovery.
Accept that beer will remain in the housing, pads, cartridge, and tubing. Include that retained volume in batch planning rather than trying to recover every last portion by increasing pressure.
9. Seal, chill, and carbonate
Close the receiving keg, manage its headspace according to your normal kegging procedure, check the keg for leaks, refrigerate, and force carbonate. Filtration does not replace correct sanitation, closure, or carbonation practices.
10. Clean or discard the media
Discard single-use pads and cartridges. For reusable media, follow the manufacturer’s permitted cleaning chemicals, backflushing direction, inspection criteria, storage method, and replacement schedule. A cartridge that looks clean externally may still retain material internally.
Control oxygen, pressure, and carbonation
Finished beer can encounter oxygen through an air-filled housing, dry tubing, an incompletely purged receiving keg, a leaking connection, or oxygenated flush liquid. A closed transfer reduces exposure only when the entire path has been prepared correctly.
Treat oxygen control as a full-path task:
- Use sound, sealed connections.
- Purge the receiving keg using an appropriate procedure.
- Displace air from the filter housing, media voids, tubing, and fittings.
- Fill through the destination liquid post.
- Keep agitation low.
- Avoid opening the path during transfer.
- Stop before the source begins passing gas or sediment.
Purging only the headspace does not demonstrate that the housing, tubing, media, or lower portion of the keg is free of air. Likewise, sanitizing a filter does not purge it, and flushing media can introduce oxygenated liquid that must subsequently be managed.
Low pressure is customary, but published values are equipment-specific examples rather than general safety settings. Homebrew procedures have illustrated operation at approximately 5 psi in one plate-filter arrangement and 10 psi in a particular cartridge setup; neither figure should be transferred to different equipment without checking every component’s instructions (5-psi plate-filter example; 10-psi cartridge example).
Already carbonated beer is harder to manage. Successful filtration may require cold, pressure-rated equipment and controlled destination back pressure.
The simplest homebrew workflow is therefore:
finish fermentation → settle → chill → filter → refrigerate → force carbonate
Treat carbonated-beer filtration as an advanced, equipment-dependent variation. Do not attempt to control foaming simply by raising source pressure or restricting the destination without understanding the connected system’s pressure behavior.
A closed transfer does not eliminate oxygen. It reduces exposure through preparation, displacement, sealed movement, bottom filling, and low agitation.
Balance clarity against flavor, body, and packaging needs
A filter cannot distinguish “bad haze” from every compound the brewer wants to retain. As filtration becomes finer or more extensive, it may reduce material associated with hop aroma, flavor intensity, bitterness perception, color, fullness, mouthfeel, foam retention, or body.
The result depends on:
- Beer style and recipe
- Media construction and rating
- Whether the rating is nominal or absolute
- Number of passes
- Temperature
- Solids load
- Media composition
- Oxygen exposure
- The drinker’s sensory threshold
Reports from homebrewers conflict. Some describe losses in body or hop expression; others perceive little difference. An American Homebrewers Association discussion cited a limited triangle test involving one English Bitter in which participants did not reliably identify the filtered sample, but one beer and one setup cannot establish that filtration is universally sensory-neutral (AHA discussion of reported sensory results).
Use particular restraint with hop-forward, full-bodied, yeast-forward, cask-style, and intentionally hazy beers. If brilliance matters but sensory change is a concern, split the batch. Filter one portion with the least aggressive media likely to work and retain another unfiltered. Compare them blind after both portions reach the same temperature and carbonation.
Cosmetic clarification is not microbial stabilization. Brilliant beer is not necessarily microbiologically stable, and a stated micron rating does not prove that a particular organism was removed. Tubing, fittings, the receiving keg, faucets, and packaging equipment can introduce contamination downstream. Do not infer sterility, pathogen removal, safety, or shelf life from clear appearance.
Force-carbonated kegging is the most predictable packaging method after substantial yeast removal. Bottle conditioning becomes less predictable because the amount and viability of residual yeast are unknown. Coarse media may leave enough viable yeast for carbonation, but that outcome is not guaranteed; tighter filtration may delay or prevent it.
If naturally carbonated packaging is required, use a deliberate yeast-management plan. Depending on the beer and process, that may involve less aggressive filtration, a tested procedure, or controlled re-yeasting rather than an assumption that enough yeast remains.
Troubleshoot slow flow, leaks, foam, and off-flavors
Do not treat additional pressure as the default solution to a filtration problem. Declining flow usually indicates a restriction or loaded media, and pressure changes must remain within the operating procedure for the actual equipment.
Slow or stopped flow
Check the system in this order:
- Is the receiving keg venting through its approved arrangement?
- Are the liquid disconnects fully engaged?
- Is a poppet, dip tube, hose, or fitting blocked?
- Is any tubing kinked?
- Is the source pressure appropriate for the approved setup?
- Has the media loaded with yeast or sediment?
A rapid decline in flow under otherwise stable conditions often indicates solids loading. Replace disposable media or use manufacturer-approved backflushing for a reusable cartridge. Do not backflush media that are not designed for it.
If repeated batches clog, improve the upstream process. Allow more settling time, rack farther above the sediment, use more effective filter area, or place a coarse stage ahead of the fine stage. Increasing pressure does not add solids capacity.
Leaks
Stop the transfer and inspect:
- Plate compression and alignment
- Pad placement and orientation
- Housing gasket condition
- Cartridge seating
- Threaded fittings and disconnects
- Tubing and clamp placement
- Housings or plates for damage
Follow the equipment’s venting and depressurization instructions before opening it. Reassemble, leak-test with an appropriate liquid, and repurge the beer path before restarting.
Beer remains cloudy
Cloudy output may indicate:
- Media bypass
- Torn, folded, or reversed pads
- Incorrect plate compression
- A cartridge that is not sealed at its ends
- Media too coarse for the intended result
- A haze type the filter cannot address effectively
- New haze appearing after filtration
Do not immediately assume that a smaller micron rating is necessary. Verify the assembly first, then compare the beer’s cloudiness cold and warm.
Excessive foam
Stop and stabilize the system. Keep the beer, filter, lines, and destination keg cold. If the equipment instructions permit adjustment, reduce the pressure differential and verify that the receiving keg is venting correctly.
Destination back pressure may help when filtering carbonated beer, but only with equipment designed and operated for that purpose. If still beer filters normally but carbonated beer foams, the more reliable correction for future batches is to filter before carbonation. Homebrewer experience reports similarly describe foaming and CO2 loss when carbonated beer is pushed through plate filters (reported pre-carbonation filtering experience).
Papery flavor
Review the manufacturer’s preparation instructions for cellulose pads or sheets. Loose fibers or inadequately prepared media may contribute papery character, but requirements vary. Do not copy an arbitrary soaking time, flushing volume, or sanitizer concentration from another system.
If flushing is required, prepare the media as directed, then manage the air and oxygenated flush liquid before introducing beer.
Dull aroma, body, or foam
The filtration may have been finer or more extensive than necessary. Compare the beer with an unfiltered portion if one is available. For the next batch, use coarser media, eliminate an unnecessary pass, or rely more heavily on settling and finings.
Remember that oxidation and filtration effects can overlap. Reduced aroma may result from media retention, oxygen introduced during processing, or both.
Unexpected beer loss
Pads, cartridges, housings, and tubing retain beer. The amount depends on the equipment, so there is no dependable universal allowance.
Measure the retained volume of your own prepared system with an appropriate test liquid and include it in batch planning. Accepting a predictable small loss is usually preferable to disturbing sediment or operating outside the normal transfer procedure.
Final decision rule
Do not filter merely because cloudy homebrew is assumed to be defective. Diagnose the haze, confirm fermentation is complete, and use settling, cold conditioning, careful racking, or suitable finings when time permits.
When rapid brilliance is worth the added work, begin with cold, mostly clear beer. Choose the least aggressive beverage-compatible media that meets the goal, clean and sanitize the equipment, purge the entire liquid path, transfer between kegs under equipment-approved conditions, and force carbonate afterward.
The best result is not the smallest micron number. It is the clarity you want without avoidable oxidation, clogging, beer loss, or removal of the beer’s intended character.
Frequently asked questions
Should homebrew beer be filtered before or after carbonation?
Filter before force carbonation whenever practical. Still beer is easier to move through typical homebrew filters and is less likely to foam or lose dissolved CO2. After filtration, seal and refrigerate the receiving keg, then carbonate normally.
Filtering carbonated beer is possible in some pressure-rated systems, but it is an advanced variation requiring cold equipment, careful pressure control, and a compatible method of maintaining destination back pressure.
What micron filter should I use for homebrew beer?
Use the coarsest beverage-compatible media that achieves the defined goal. Approximate nominal conventions are:
- 5–10 microns for coarse yeast and sediment reduction
- 1–5 microns for finer visual polishing of cold, settled beer
- A coarse stage around 3–10 microns before a fine stage around 1–5 microns when the finer media would otherwise load rapidly
An already clear beer may need only one stage. Do not compare micron numbers without checking whether the ratings are nominal or absolute and considering media area, depth, construction, solids capacity, and sealing. Expert homebrewing guidance similarly recommends coarse prefiltration before fine media when clogging is likely (Craft Beer & Brewing’s filter-selection guidance).
Can filtered beer still be bottle conditioned?
Possibly, but the outcome becomes less predictable as filtration removes more yeast. Coarse media may leave enough viable yeast for natural carbonation, while tighter filtration may not. The micron label alone does not reveal how much viable yeast remains.
Force-carbonated kegging is therefore the simplest packaging method after filtration. If bottle conditioning is required, use a deliberate yeast-management plan rather than assuming residual yeast will be sufficient.
Can I use a household or activated-carbon water filter for finished beer?
Do not use activated carbon for finished beer. It may adsorb compounds that contribute wanted aroma and flavor.
A household-style housing can sometimes be incorporated into a beer-filtration system, but the cartridge must have documented beverage compatibility, suitable construction, known pressure and temperature limits, and an appropriate filtration specification. Many household cartridges are designed for water contaminants rather than yeast-bearing beer and may clog or alter flavor. Brewing guidance specifically cautions that ceramic and carbon water filters can be poorly suited to finished beer (filter-format and media advice).
Will filtering remove chill haze completely?
Not necessarily. Chill haze forms or becomes visible when beer is cold, so cold filtration presents more of it to the media. Some chill-haze particles, however, may be smaller than ordinary homebrew polishing filters can reliably retain.
If beer is clear when warm and cloudy when cold, combine diagnosis with cold conditioning, appropriate finings, and prevention of haze-forming material. Treat complete removal as an outcome to test in the specific beer—not a guarantee attached to a micron label.